
So the first two dozen will be the same elongated copper stamping (got them at Metalliferous) that I did the samples in .

The hard part is always cleaning and prepped - My favourite tool is the dremel with the split mandrel and sandpaper.

I laid them out and started cleaning

I made my way down the line with the dremel - I only clean one side as that is for the stamping side - no sense cleaning the other till your ready to finish - and once finished cleaning with the dremel and sandpaper- I donned my rubber glove and finished them with steel wool
the rubber glove was to make sure I didnt leave any fingerprints and oil on the blanks. Not just so you have a clean surface - any oils may create a resist to the ferric chloride as well.

Once finished they were ready for stamping

I prepped the rubber stamp (available on etsy - see side bar)
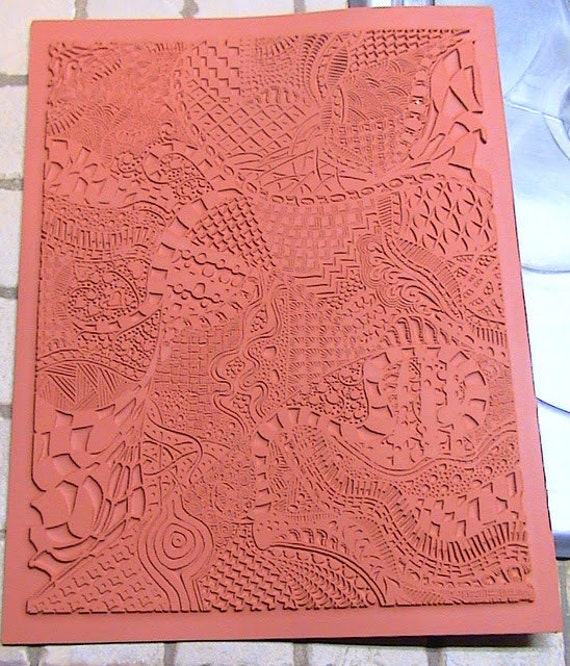 (this is stamp #2 pattern) I took the stazon and made sure the pad was properly wet with ink and dabbed it onto the stamp area I wanted to work - I did not do the whole stamp as it would dry quickly and be wasted -the white in this case - not sure if it really matters what color you use as the ink dries quickly and is taken off with acetone. And my micheals only carries the white for some reason.
I place the clean side down carefully - pressed down evenly - placed one finger at end and pressed down which raises the other end and again carfully grabbed the sides and set to the side to dry . I was trying to keep the pairs relatively close in pattern as I stamped - but they are not identical - that is the randomness (is that a word) of the zentangle. Because I wanted to use the same general area I again dabbed the ink onto the stamp and just kept going.


Some of the stamping was pretty darn close to being the same
Hard to see with the light reflection but all two dozen stamped and now ready to go into the etching solution.
It takes only a minute or two for the staz on to dry which is great - makes it easier to handle
I prepared so that each tape would hold the pair - when its a single metal bracelet it suspends across the container - but because these are smaller the weight bends them in the center so you want them to be balanced and not fall to the center of the container- just enough so they are suspended on the surface - I could probably fix this by adding some sort of support on the tape or making a floating double sided tape on some foam - which I am looking around for - havnt had any in my shipping /packing lately - my current set up holds 6 sets at a time - need to get another large glass container and get out my other hot plate.

anyway - only 3 more batches to go - I have to stay up to at least 11pm tonight and take them out and put them into baking soda to stop the etching process - and dry them off - while the first batch is in tomorrow Ill start to finish - Yawn - 1-1/2 hours to go ........ so I will show tomorrow the results of batch 1
\
So ambitious! I hate the cleaning/sanding part, too. I have never used any tools for this; just a coarse emory board and some elbow grease. I have the dremel and all the attachments, but am baffled by all of them, and I don't know what most of them are for! I know one of them sharpens a lawnmower blade, like I would ever need that! LOL
ReplyDeleteThe earrings look terrific! Do you find the heat significantly help the etching? I've never used heat, and I seem to get a terrific etch every time anyway.
How long do your etching baths take, Freedom?
DeleteHeat really speeds it up. With Fresh material I find 1-1/2 hours is all it takes to get a good etch. 2 hours maybe a little too deep. I've been adding some citric acid as well - I'm not a patient person and the faster the better. I add a little fresh material each time I etch not much so by the time I finish I'm at the top of the tray - I try to keep to the same time schedule but the material does slow down eventually.
ReplyDeleteHow do you add the color? Love these earrings
ReplyDeleteEarrings are beautiful. Did you use alcohol inks or is that enamel to finish them? Keep up the great site.
ReplyDeleteThank you for helping people get the information they need. Great stuff as usual. Keep up the great work!!! https://bit.ly/2LK7inm
ReplyDeleteTraditionally, these have been yellow rubber gloves, but various brands will also offer green and orange rubber gloves for distinction. When purchasing gloves, it is important to know what to look for to ensure the best purchase possible. glovebox antechamber
ReplyDeleteSo glad to learn about stazon stamp pad and my zentangle stamps and I had become super excited seeing your plan to create 2 dozen copper stamps by a day. Really stamping has become an art and using rapidly in all the fashionable ways. I wanted to read through the laser stamping and already gone through the heatsign, a great place to learn and grab the laser stamping machine. Anyway, the copper and rubber stamps look incredibly beautiful.
ReplyDeleteThe deep laser engraving machine is used for processing products in 2.5D shapes.
ReplyDeleteGood post
ReplyDeleteGreat
ReplyDeleteAmazing and this looks great. The stamping is done so carefully. I like these earrings. To get more custom metal stamps and dies visit our website.
ReplyDelete